LED on and off using button
-: LED CONTROL USING BUTTON :-
Aim :- एक digital signal के द्वारा किसी भी LED (लाइट एमिटिंग डायोड ) को कण्ट्रोल करना।
Material :- एक LED को CONTROL करने के लिए FOUR कॉम्पोनेन्ट की आवश्यकता है।
1. Arduino Uno
2. Button
3. LED
4. Resisters(10k,220)
Circuit diagram :-
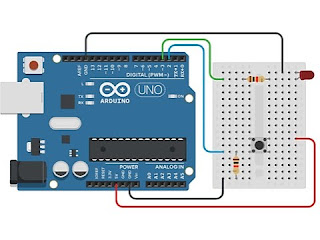
Method :- सबसे पहले Arduino Uno Board लिया है। और एक LED तथा Button और रेसिस्टर लिया है। Button के साथ 10k ओम का resister कनेक्ट करना है।यहाँ पर 10k का resister एक वोल्टेज divider का काम करेगा। 10k ओम रेसिस्टर पिन को Arduino Uno की GND से कनेक्ट करना है। और LED के cathode पिन को Arduino Unoकी GND के साथ कनेक्ट करना है। Button से आने वाले signal को Arduino Uno की digital pin 2 मे कनेक्ट करना है। digital pin 2 एक इनपुट पिन की तरह react करेगी। तथा digital pin 3 को LED की एनोड पिन को 220 ओम रेसिस्टर के साथ कनेक्ट करना है।
Program :-
int led = 3;
int buttonpin = 2;
int buttonstate = 0;
void setup()
{
pinMode(led,OUTPUT);
pinMode(buttonpin,INPUT);
}
void loop()
{
value0 = digitalRead(buttonpin);
if(buttonstate ==1)
{
digitalWrite(led,HIGH);
delay(100);
}
}
Thanks for Reading .................................


.png)
Comments
Post a Comment